Using the MotionBuilder Plugin to Move an Avatar
In the next step, let's install the MotionBuilder Plugin in MotionBuilder to try and make an avatar move.
Advance Preparations
Prepare to use the MotionBuilder Plugin using the following procedure.
- Connect the PC (Windows) on which MotionBuilder is installed to the local network.
- Access the Downloads page and download the latest version of the MotionBuilder Plugin.
- Extract the downloaded ZIP file to any folder.
For details about the distributed data, refer to Content of the distributed data. - Connect the smartphone on which the mocopi app is installed to the local network.
- Refer to Sending Data from a mocopi App for the state in which motion data can be sent using UDP from a mocopi app.
Specify the IP address of the PC on which MotionBuilder is installed in the "IP" field, the port number (initial value: 12351) to use in the "Port" field, and "mocopi (UDP)" for the send format.
The advance preparations are now complete.
STEP 1: Install the MotionBuilder Plugin
-
Copy the MotionBuilder Plugin (following two DLL files) extracted in Step 3 of the Advance Preparations to the MotionBuilder plugin folder.
- mocopi_plugin_mb.dll
- sony_motion_format.dll
Caution
Be sure to use the files in the folder of the same version as the MotionBuilder.
Reference
MotionBuilder plugin folder path:
Ex.) C:\Program Files\Autodesk\MotionBuilder 2023\bin\x64\plugins - Start MotionBuilder.
If MotionBuilder is already running, restart it.
The MotionBuilder Plugin is now installed.
STEP 2: Set up the Plugin in MotionBuilder
- Click the [Asset Browser] tab in the MotionBuilder Resources window.
- Double-click the [Templates] tab in the tree located in the left pane of the Asset Browser, and click [Devices].
-
Drag and drop the "mocopi plugin" icon to the Viewer window to add it to the scene.

- Click the [Navigator] tab in the Navigator window.
- Double-click the [Devices] tab in the tree located in the left pane of the Navigator. and click [mocopi plugin].
-
Select and run [Create...] in the "Model binding" field.
The skeleton appears in the Viewer window.


Reference
mocopi characters that have not been characterized are also generated directly under [Characters] in the tree.
The MotionBuilder Plugin has now been installed in MotionBuilder.
STEP 3: Receive and validate motion data
- Enter the port number to receive the data via UDP (initial value: 12351) in the "Port" field under the Navigator window > [Navigator] tab > [General] tab.
Enter the same number as the port number specified in the mocopi app. -
Click [Online].
It is now waiting to connect. The [Online] indicator changes from red to yellow.


-
Operate the mocopi app to start the UDP transmission of the motion data.
When the MotionBuilder Plugin receives the motion data, the [Online] indicator changes from yellow to green. The motion data is applied to the skeleton and starts the movement.Caution
When the Always Refresh Viewer option is not turned on in MotionBuilder 2022/2023/2024, the MotionBuilder screen will not be refreshed when other applications are active. Turn the Window->Profiling Center->Always Refresh Viewer option on.
Reference
At this point, the mocopi characters are characterized.

The motion data has now been received and validated.
Reference
When receiving motion data of multiple players (multiple mocopi apps), perform Steps 2 and 3 for each player. A different port number for sending and receiving via UDP must be specified for each player.
STEP 4: Record and play back the motion data
You can record and play back motion data (skeleton movements) using the following procedure.
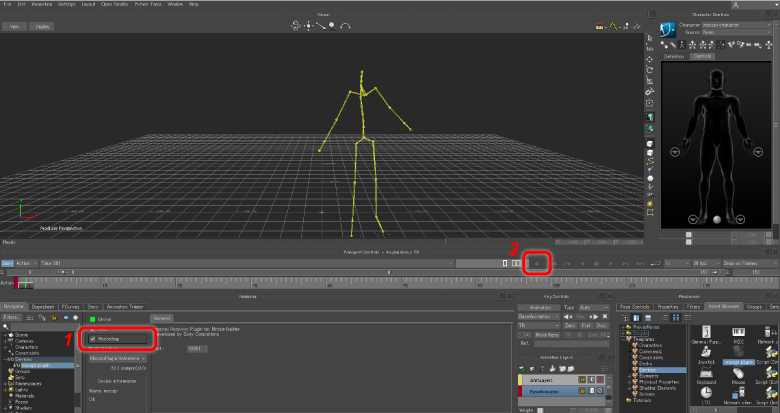
- Click and check the [Navigator] tab > [Recording] in the Navigator window while receiving motion data.
-
Click the Record button.
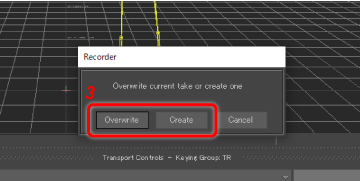
A message box is displayed to confirm whether you wish to create a new take or overwrite an existing take.
-
Click the [OverView] or [Create] button.
- Click the Play button.
The motion data recording starts. Click the Play button once again to stop the recording. -
When the recording finishes, click [Recording] to uncheck it.

- Click [Live] to uncheck it.
-
Choose a take and click the Play button.
The recorded data is played back.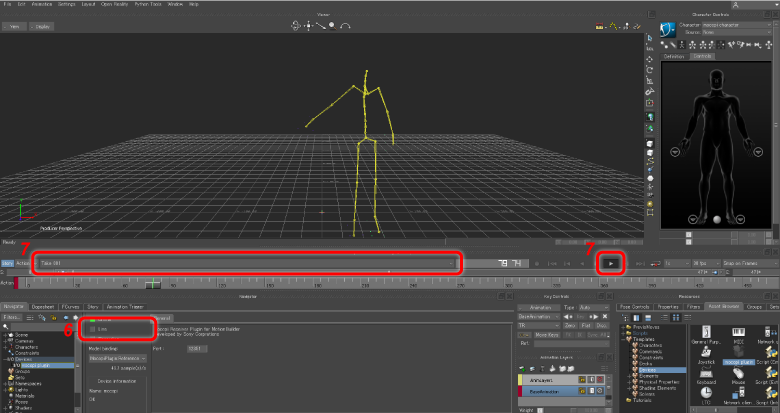
Motion data can now be recorded and played back.